Archive for the 'Tutorial' Category

Pop Up Diorama Tutorial

Hi ho everybody!

I’ve been terribly neglecting the little green box. There’s so much going on in our lives right now and my crafting skills and efforts were focused elsewhere (I’m nesting like a crazy bird… more about that – on a different post). I have a few things to share with you, but because I’ve been such a bad blogger – I’ll start with this really cool diorama tutorial!

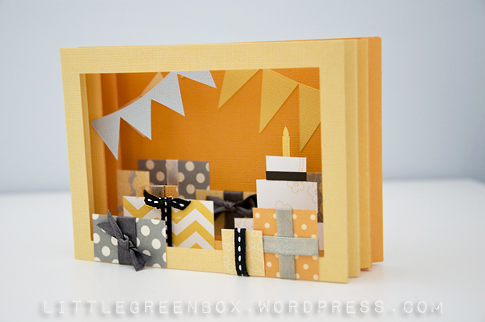
So, what’s a Diorama? one of the dictionary’s definitions is: “a miniature three-dimensional scene, in which models of figures are seen against a background”. Miniature? 3D? Sounds good to me. There are many ways to create a diorama, and if you google it you’ll probably find many versions and ideas. This tutorial will teach you how to make a most basic diorama frame, which you can personalize, change and adjust to your liking. The cool thing about this one is that, not only this is a tiny 3D picture that you can put on display, but it also FLATTENS so you can put it in an envelope and mail it! Pop-up card and diorama, all-in-one!

So – shall we begin?

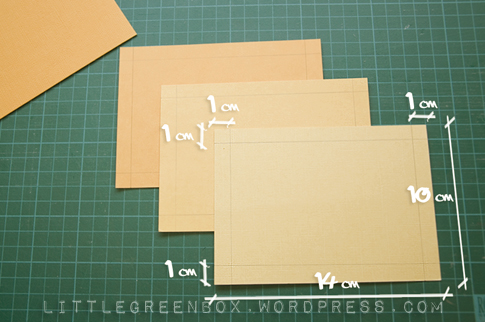
1. First step will be to choose your papers. I chose a collection of 4 shades of orange cardstock. Feel free to choose patterned paper instead, as long as it’s as heavy as cardstock, so it won’t come out too flimsy.
Next, cut your papers so they’ll measure slightly less than your envelope. My envelope was a 11×15 cm, so I’ve cut all my papers 10×14 cm. The diorama comes out a bit thick, so you’ll want to make sure it slides easily in and out of the envelope. Not using an envelope? cut it any size you want!
Use a pencil and mark a 1 cm inner frame on the back of three of the papers, leaving out the one paper you chose for the back of the diorama. I wanted my shades of orange to go from light (in the front) to dark (on the back), so I left the darkest shade unmarked.

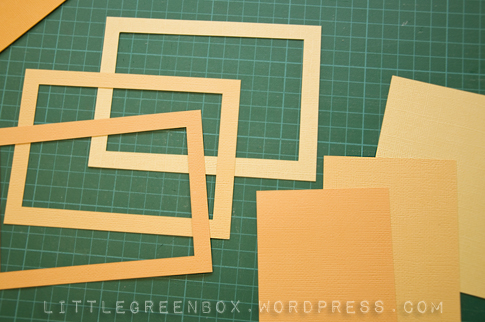
2. Cut out the frames you marked (remember – the back of the diorama stays uncut!). Keep the insides of the frames aside, we’ll use them in a moment.

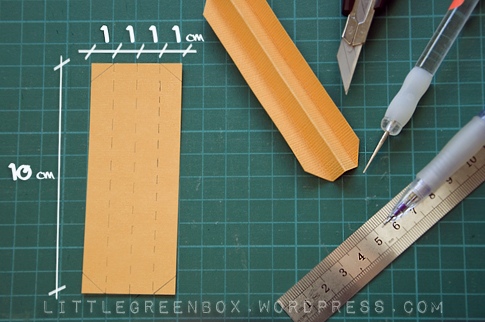
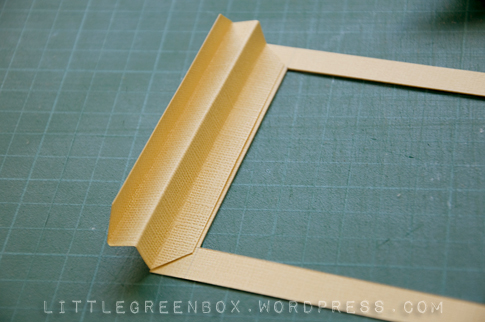
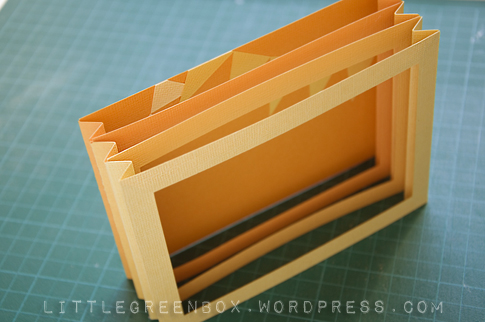
3. Using the insides of the frames from the previous step, cut two strips of paper from each color. Each strip should measure 10×4 cm. Score the strips using a bone folder or stylus, following the measurements in the picture below. Trim the corners as shown below and fold the strips to create little zig-zags. These pieces are the “hinges” of our little pop-up diorama.

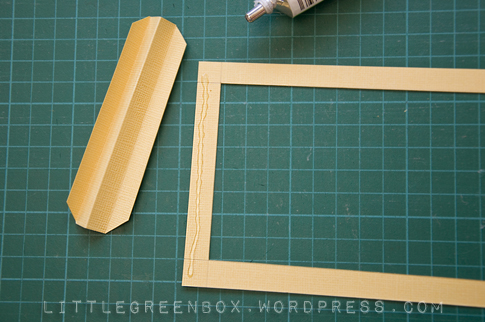
4. Take your first frame, the one you want to place in the front, and add a stripe of glue to the back of one of its shorter edges. Make sure to use the glue on the back – we’re trying to keep the rough edges out of sight!

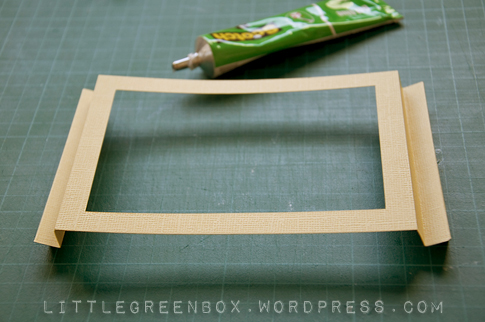
5. Take one of the “hinges” in the same color as the first frame and attach. Make sure that when you turn the frame over to its right side, everything is neat and aligned, the hinge’s glued tab is not peeking from the side (or the inside) of the frame.
Repeat this step on the other short edge of the frame, with the second coordinating hinge.

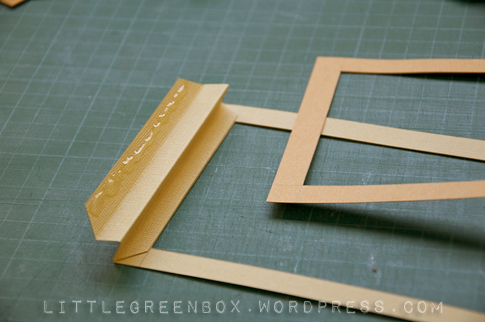
6. With the first frame facing down, add a stripe of glue to the inner tab of one of the attached hinges.

7. Place the next frame in line on the hinge, making sure it’s not sticking out on the top or the bottom.

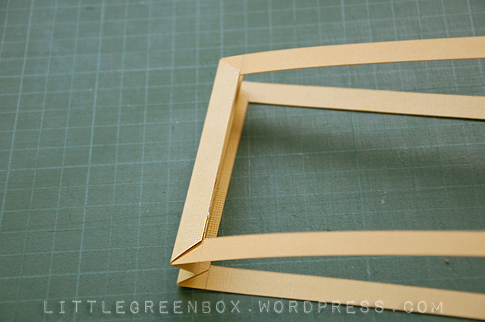
8. Close the tab with the glue on top of the frame. Repeat on the other side.

9. If you made it this far – you got it! You have completed the first scene of your diorama!

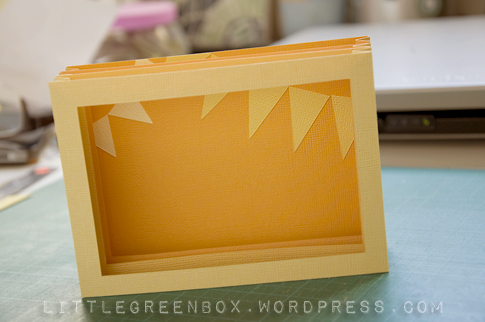
10. If you follow steps 4-8 with the rest of the frames, you’ll receive this finished diorama base! I warmly recommend to decorate the last piece – the back of the diorama – in advance. It’s much easier than trying to stick your fingers in there for stamping or gluing…

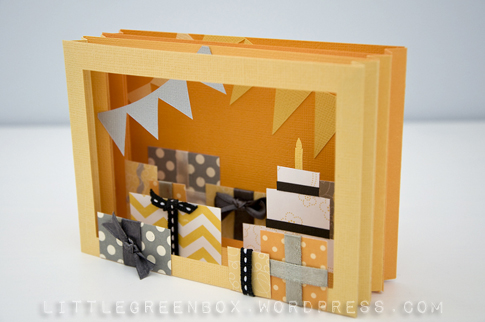
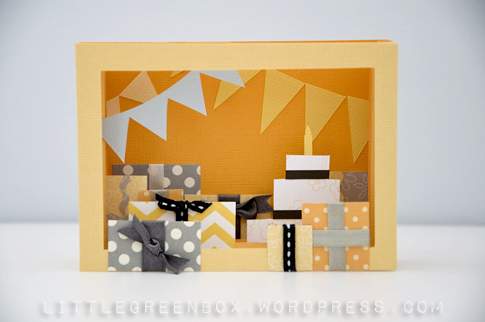
11. Now you can stamp, cut, punch whatever elements you want, to create your special little scene.

Pop Up Diorama Tutorial - littlegreenbox.wordpress.com

TIPS AND TRICKS:

* I wouldn’t recommend adding more frames if the diorama is meant to be placed in an envelope. However, if it’s purely for decoration, you can add as many frames as you want!
* Use the entire frame, not just its bottom (as I did with the gray flags). It’ll make the diorama seem deeper and more dramatic.
* The back of the diorama doesn’t HAVE to be uncut. You can make it as a frame too, creating a see-through diorama.
* Why cut square frames? keep an approximately 1 cm margin (just to make sure the frame is solid), and cut the inside in the shape of a curtain, clouds, forest branches…
* Frame the diorama in a shadow box to get a very cool 3D decorative piece!

This diorama flattens to fit an envelope, but when pulled out it pops right up and becomes 3 dimensional and awesome!

Have fun with it!
ShirA
Moving Arm Pop-up Tutorial

Time for another tutorial!
This great mechanism is super-easy and actually really basic, but it can be the base for many beautiful 3D cards! I chose butterflies as an example to demonstrate the mechanism, but it could have been anything else: balloons, flowers, little signs with words on them… Be bold and creative, and share your results with me! 🙂

1. Start by choosing the paper you’re going to use. I went for green dotted cardstock for the base of the card. Make sure the base of the card is made out of sturdy, heavy-weight cardstock (and not thin paper).

2. Cut the paper for the card’s base measuring 20×15 cm, score in the middle and fold (you’ll obtain a 10×15 cm closed card).

3. Now would be a good time to make all the bits and pieces that will decorate your card. As the main moving elements I stamped butterflies on an off-white card stock, and cut them out carefully. I also cut some leaves in different shades of green for the background.

4. Next step – the mechanism itself. First download the template:

Moving arm mechanism PDF template

Print it out on a A4 sheet of paper and cut the template out, leaving margins around it as shown on the sketch and picture.
Use some masking-tape to attach the template to a piece of patterned paper (I recommend using the same paper as the card’s base. That way the mechanism will blend better and be less visible). Using a stylus or bone-folder, score all the dashed lines of the template. That will allow all the folds to be sharp and accurate. Cut along the continuous lines and remove the template.

5. Fold and unfold all the scored lines to ensure flexible axes. Fold the mechanism in two. Add glue to one of the glue tabs and place the mechanism somewhere along the central fold of the card’s base. Make sure the mechanism’s crease is facing you and is perpendicular to the card base’s crease.

6. Add glue to the other glue tab and shut the card close. Wait for the glue to dry, do not be tempted to open it right away! This is how it’ll look once you open the card.

7. The base of the mechanism is done! To create the arms that carry your main decorative element I suggest using double-thickness paper. Simply glue two pieces of card stock (again, I used the same paper as the card’s base) back to back.

8. Once the glue of your double-sided paper dries, you can cut the arms out of it. You can make them straight or curved – as you wish!

9. Glue an arm to the back of a decorative element (for me, it was a butterfly). Glue the other side of the arm to the mechanism, open and close your card just to make sure nothing peeks out when the card is closed. You can finish the card here, or add more mechanisms and more elements. Notice how attaching the arms to the mechanism’s base in different angles creates a more interesting result.

10. Time to decorate the outside of your card. You’re all done!


Have fun 😉
ShirA

The Glue Gun Girl – Interview + tutorial!

I haven’t been around much, I know, but here’s a treat to win your hearts back – check out the Glue Gun Girl blog. The blog’s author is Lisa, a song writer from the UK, who writes almost every day (unlike lazy me…) about all things DIY, from super cool crafts to fun party cocktails.

She kindly asked me to answer a few questions, like a short interview for her blog. I gladly wrote back, adding this great tutorial for a last minute Valentine’s card – a winged heart pop up for the one who makes your heart fly!

Come on! Click the link and meet the Glue Gun Girl!

Have an awesome week, full of love and chocolate!
ShirA

A Royal Crown Pop-Up Card

Hi everybody!
I’ve been back from an amazing vacation in Thailand for over two weeks now, and the sunny, warm beaches already seem like a faraway dream…
Now that I’m back, I think it’s time for a new and awesome tutorial! These lovely Royal Crown pop up cards are a great gift for a newborn (a little “prince” or “princess”), a nice way to tell a colleague “you rule!”, or a funny way to congratulate a friend on their new house (“king of the castle!”).
I’d like to thank my beautiful friend Tamar for being my hand super-model 😉

There’s a Heart Crown –

And a Basic Crown –

The tutorial I’ve made is long and detailed, but trust me – it’s super easy to make. Just follow these steps to create a fun pop-up you can decorate and personalize as you please.

1. First thing’s first – PRINT. Choose the Basic Crown or the Heart Crown template. They are basically the same, only the Heart Crown in more elaborated and requires a bit more work (oh, and has a heart on it, too).

Press here to download the Basic Crown PDF

Press here to download the Heart Crown PDF

In this tutorial I used the Basic Crown, but the steps ahead apply to both.

2. Time to choose the paper you’re going to use. You will need paper for the inner card, for the outer card and for the crown. The patterned paper is optional, something to spice up the exterior of the card.
I chose pale green card-stock for the inside, olive green textured card-stock for the outside, warm yellow textured card-stock for the crown itself and some groovy patterned paper for the extras.

3. Cut the interior card 20×14 cm, and the exterior 21×15 cm. Use a bone folder or a stylus to score them both in the middle. Fold the cards in half, along the scored axis, to achieve a neat fold.
This would be the time to round the inner card’s corners, stamp it and so on.

4. Measure 4 cm from the center, and mark it with a pencil. It doesn’t matter if you mark it left or right from the fold.

5. Now, take a look at your printed template. You’ll notice that some of the lines are dashed. These lines will be scored, not cut. The little tabs act as gluing tabs.

6. Cut the extra paper around the crown, leaving just a narrow frame around it.

7. Secure the template to the chosen card-stock with some masking tape.

8. Score all the dashed lines with a bone folder or a stylus. Apply a little bit of force to make sure it gets across to your card stock. Now cut all the lines around (DO NOT cut the dashed lines!).

9. The circular part can be either cut with scissors or punched out with a circle punch (the template matches a 1 1/4″ circle punch perfectly).

10. Your cut-out crown should look like this:

11. At this point I would recommend you take your bone-folder or stylus and have another go at the scored lines in order to make them easier to fold.

12. Fold the scored lines, so that the crown is folded in half and the glue tabs are folded inwards.

13. Add glue to the tab at the side of the crown.

14. Close the crown down over the glued tab and press. Wait a little allowing the glue to set.

15. Add some glue to one of the tabs at the base of the crown.

16. Turn the crown over, glued tab facing down. Align the crown’s base with the line you’ve marked earlier. This is the time to make sure the crown is located nicely and symmetrically on the card.

17. Push down the glue tab so it’ll stick to the card. Allow to set.

18. Add glue to the second tab at the base of the card.

19. Close the card over the crown and press. Give it a few moments for the glue to set.

20. There you have it! A royal crown!

21. Glue the inner card to the outer card. Notice the outer card gives a nice frame to the inner one. You can embellish the exterior card as you please, and give it to a regal loved one!

Hope you liked it! 🙂

ShirA

Automatic Sliding Tab Tutorial

Hi everybody!

It’s been a while since I last posted here, work has been crazy lately and I had no time. This post has been waiting for some time now, and it’s finally done and published for you! Enjoy.

After the great responses for the Deep Purple card and the Winter Butterflies card, I took the time to create this step-by-step tutorial. Night falls so early these days, I had no choice but to take the pictures with terrible artificial light. Not the best conditions, but it’s far better than nothing at all, right? 🙂

The card I made here was measured to fit a 15X12 cm envelope, so at the end of the process you’ll get a 14X10.5 cm card.

1. Choose the papers you’re going to use for the base of the card: I used light gray cardstock measuring 14X21 cm for the exterior of the card, and a dark gray cardstock measuring 13X20 cm for the interior of the card. Score both to create a center-fold.

2. Take a piece of cardstock, same kind as the one you chose for the interior of the card. Mark with a pencil sections as shown in the picture.

3. Cut the pop-up base and tab from the piece of paper you’ve just marked. This is the time to decide how big you want the pop-up base and pulling tab to be. I went for a 6 cm strip, you can try this out and once you get the idea you can do it any size you want, but no more than your interior card height (in this case – no more than 13 cm). You can see in the picture I’ve cut some corners off, it’ll make hiding the gluing and sliding tabs a lot easier later on.

4. Score the tab as shown below.

5. Fold the scored lines to get the hinges your pop up and tab will need. Notice at the photo that most of the creases are mountain folds, except for the smaller gluing tab.

6. Take the interior base of the card (from step 1) and flip it over. Mark with a pencil the trail of the tab, following the measurements shown below.

7. Cut 2 “C” slots, slightly wider than the tab’s trail real width. That way, the tab will move freely and won’t tear.

8. Flip back the interior base of the card. Insert the tab into the slots and make sure it moves smoothly in there.

9. Add glue to the gluing tab, fold it underneath and press firmly. Allow to dry before continuing.

10. Apply glue to the second glue tab and close the card.

11. Press the card firmly to allow the glue to dry.

12. Open the card and – voila – the mechanism is ready!

13. Glue the interior base to the exterior base, and you’re ready to decorate the inner and outer side of your card! Use the pop-up base for any flat decorations, either busy or simple and clean.

Try it in different sizes and be creative!
ShirA

A Popping Heart Tutorial


This is a cute Valentine’s day card I made for the new Israeli Scrap site. It’s an awesome site which provides a fresh and inspiring stage for Israeli scrappers to shine on. Scrap.co.il was created and is being run by the lovely Michal Shoval It is constantly being updated with articles, links and tutorials. Make sure to check it out!

As for this card, it’s a cross pop up mechanism, very simple and fun. You can change the heart shape into any other symmetric shape. I decided to make this card quite wide in order to allow for a large heart shape. If you follow the simple principles described below, you can make a card of any size and shape. Good luck!

1. Cut the base of your card from card stock or heavy weight paper. I’ve made mine a 28X10 cm, to create a long 14X10 cm card when closed. Score a center fold.

2. Use a scrap of paper to create the template for your center shape. Fold the paper in half and draw half of the shape. Cut it and open up the fold to receive a symmetric heart (or any other shape, for that matter). Important – when still folded, the heart’s widest point shouldn’t be wider than a third of the card’s side. To better understand this, have a look at the photo in step 3.

3. Place the heart shape on the card’s side and make sure it’s not wider than 2/3 of it. If the card’s side measures 14 cm (“3X”), then the heart’s width should be 2/3 of that – 9.333 cm (“2X”) or less. If it’s any bigger, it’ll peek out when the card is closed, and ruin the surprise!

4. Use the template to create 2 identical hearts from card stock. Do not fold these in the middle.

5. Make a narrow slit along the center of the heart shapes: one should run from the top of the heart to the middle of it, and the other from the bottom to the middle. Please note I’ve made my slits pretty wide for demonstration purposes, try to make them more slender (but make sure to take a bit of paper off, a cut-through won’t be enough).

6. Take another piece of card stock, preferably the same kind as the base of the card. Cut a long strip and score folds in it as shown (“X” being half of the heart on it’s widest point). Don’t forget to leave a small gluing tab.

7. Fold the scored lines and add glue to the gluing tab. Glue the stripe into a closed loop.

8. Slide the two hearts into one another.

9. You’ll receive a double layered heart with a “hinge” in the middle.

10. Flatten the stripe and apply glue to one of the stripes’ faces.

11. Glue the stripe to the heart, as close to the middle “hinge” as possible.

12. Add glue to the opposite face of the stripe.

13. Close the heart on top of the strip and press firmly. Let the glue set.

14. Apply glue to the two faces of the stripe that pop out of the heart, and glue it to the base of the card, as close to the center fold as you can. Close the card firmly and let the glue dry.

15. That’s it! You’re done!

Hope you liked it! 🙂

ShirA

Pop-up tutorial #4: “Table-Top” or “Floating Plane” – Variations

This tutorial will show you how to take the basic “table-top” technique and take it to a new level. The variations shown here, including the measurements, are simply an example to get you started. There are no rules, and you can experiment with it and get different results.

1. Cut cardstock to your desired card size. Mine is 20X15 cm (to achieve a 10X15 cm card when folded). Score a center fold with a bone folder.

2. Cut out the cardstock pieces that will eventually be your “table-tops”. You can use a stamped image, a die cut shape, etc. To demonstrate the general idea I simply used 2 rectangles (shown in red). The table-tops can be as high as you wish (but no higher than the card’s height, or it’ll peek from the edges of the card when closed). Check it during the preparation of the card, make sure it is doesn’t peek on the sides when closed. Score a center fold with a bone folder on both pieces.

3. Now create the table-top’s “legs”: use 2 stripes of cardstock for each “table-top”, following the measurements in the picture (make two stripes of each kind). Score accordingly .

4. Fold the “leg” stripes where you’ve scored them. Add glue to the little gluing tab and close the stripe, creating a closed rectangle. Do the same with with all 4 pieces.

5. Now, glue both pieces together. You’ll end up with two flexible shapes, as shown below.

6. Add glue to the bottom faces of the “legs”, and glue them to the back of the table-top piece, close to the center fold. Let the glue set before you continue.

7. Flip the table-tops (red) pieces inside-out, so they’ll look like this.

8. Add glue to the “legs” of the smaller “table-top”, and attach it to the face of the larger one, close to the center fold.

9. Add glue to the “legs” of the larger “table-top”, and attach it to the face of the card base (in yellow), close to the center fold.

10. Close the card firmly and let the glue set well. You’re done!

More Variations

There are so many different variations you can make with this basic technique. You can build more floors, changing the “legs” measurements.
Another option is to add another set of “legs”, attached to the sides of the basic mechanism, as shown below. Just try it out, go wild! 🙂

Pop-up tutorial #3: “Table-Top” or “Floating Plane” Technique

Hi everybody!

As promised, I’m going to give you a step-by-step tutorial for the technique I used on my Monochrome Monday card. This is the basic principle. Once you get the hang of it, you can change the measurements and shapes and get creative.
Ready? Lets get down to business:

1. Cut cardstock to your desired card size. Mine is 20X15 cm (to achieve a 10X15 cm card when folded). Score a center fold with a bone folder.

2. Cut out the cardstock that will eventually be your “table-top”. You can use a stamped image, a die cut shape, etc. To demonstrate the general idea I simply used a rectangle (shown in red). The table-top can be as high as you wish (but no higher than the card’s height, or it’ll peep from the edges of the card when closed). It should also be narrower than the card’s width when closed. Meaning – if the card’s width, when closed, is 10 cm, the table-top should be no more than 10 cm wide. Score a center fold with a bone folder.

3. Now create the table-top’s “legs”: use 2 long stripes of cardstock, as wide as the card (shown in orange). I’ve made mine 3 cm high and 20 cm wide.

4. Score the 2 “legs” as shown. The principle is simple: A + B should be less than the card’s width when closed (10 cm).

5. This is how the stripes look after folding (all mountain folds).

6. Add glue to the little gluing tab and close the stripe, creating a closed rectangle. Do the same with both pieces.

7. Now, glue both pieces together.

8. You’ll end up with two flexible parallelograms, as shown below.

9. Flatten the “legs”.

10. Add glue to one of the faces of the “legs”, and glue it to the back of the table-top piece, close to the center fold (to better understand which face should be glued, look at step 12 for the desired result).

11. Turn over the table-top and glue the other face of the “legs”. Close the table-top piece firmly and let the glue set for a few minutes.

12. This is what you should end up with.

13. Flip the table-top (red) piece inside-out, so it’ll look like this.

14. Add glue to the “legs'” face (orange), and attach it to the card’s base (yellow), close to the center fold. Turn the card over and do the same on the other side.

15. Close the card firmly and let the glue set well.

16. You’re done! The table-top pop up is ready!


A few tips:
* I recommend using the same paper for the card base and “legs”, to make them less obvious.
* This card tends to be quite thick and bumpy, to make sure the card base will handle it I prefer adding another cardstock for the card’s exterior. You can see an example on my Monochrome Monday post.

There’s more! In a few days- some “Table – Top” pop – up technique variations!

Have a great weekend,
ShirA

Step up!


This card is based on the asymmetric box mechanism, taking it to the next level. I made this card for a friend’s 30th birthday, the colors are a bit more “boyish” and the card is clean and basic.
It’s so easy to make, and has a great impact. I wanted you all to be able to do this one, so I made you a template! just download the Step Up template, and make your own!

Step up Template- Press here!

Save the template and follow these instructions:
1. Use a bone folder to score along the dash and dot-dash lines.
2. Cut along the continuous lines. Notice that all the continuous lines that you cut are perpendicular to the center fold of the card- while the dash and dot-dash lines are parallel to the center fold.
3. Gently pinch the folds that you’ve scored: the dash lines are valley folds, the dot-dash lines are mountain folds.

You can decorate it as you please, just notice that the template is for the paper you will use on the inside of the card. You will need to add another cardstock for the outer side. I chose a very calm palette here, but using a popping color on the back can be really cool – it’ll peep through the steps of the card, emphasizing it’s dimension and depth.

Enjoy!

ShirA


Pop-up tutorial #2: Asymmetric box fold

The asymmetric box fold creates a “shelf” or a few “shelves”, that are non-symmetric in height and depth. This technique is the base of many elaborated and impressive cards, all you need is to practice a few basic principles. Follow the next steps for an easy- yet potentially impressive- pop-up card.

1. Select the paper that you intend to use on the inside of the card and, using a pencil, lightly mark it’s center fold. I used a scrap of printer paper for this demonstration, but a card stock or heavy-weight paper will provide you with a sturdier mechanism.

2. Draw one or more rectangles of any size, located anywhere on the card. There is a rule you must follow: The depth of the rectangle is the same as the distance of the rectangle’s base from the center fold (in the photo below you can see I’ve marked it: x = x, y= y). If you don’t follow this rule, the rectangles will be distorted, the angles at the corners will not be 90 degrees.

3. For each rectangle, cut along those sides which are perpendicular to the fold (marked with a red solid line). Score the lines that are parallel to the center fold, DO NOT cut along them (marked with a yellow/blue dash line). Fold gently along the center fold, wherever there are no rectangles. Push the boxes gently inwards, noticing the “mountain” folds and the “valley” folds. Pinch the corners of each box to set the fold into its new direction.

4. Carefully close the card, making sure to flatten the creases you initially scored.

5. And there you have it! Note that the box is asymmetric- the height and depth are not the same. Therefor, the same fold can look and be used differently when positioned in various directions. You can use the boxes as a base for glued-on decorative images, or even use them as the main popping element of the card.


On the next post I’ll be showing you how to make a far more complicated asymmetric-box card, easy to do and very impressive 😉

ShirA


My Name is ShirA. This is my personal blog, where I share my love for paper craft, hand made creations and all things beautiful.

You can contact me at:
shira.littlegreenbox@gmail.com

PLEASE do not publish photos, tutorials and text from this blog without my permission.

Categories

Enter your email address to subscribe to this blog and receive notifications of new posts by email.