Hi ho everybody!
I’ve been terribly neglecting the little green box. There’s so much going on in our lives right now and my crafting skills and efforts were focused elsewhere (I’m nesting like a crazy bird… more about that – on a different post). I have a few things to share with you, but because I’ve been such a bad blogger – I’ll start with this really cool diorama tutorial!
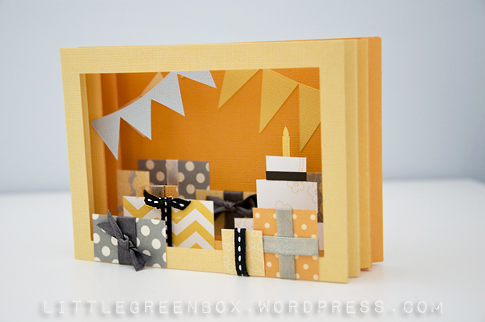
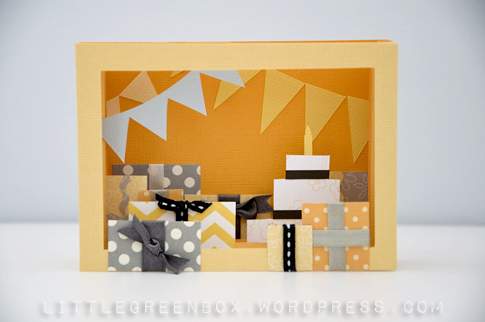
So, what’s a Diorama? one of the dictionary’s definitions is: “a miniature three-dimensional scene, in which models of figures are seen against a background”. Miniature? 3D? Sounds good to me. There are many ways to create a diorama, and if you google it you’ll probably find many versions and ideas. This tutorial will teach you how to make a most basic diorama frame, which you can personalize, change and adjust to your liking. The cool thing about this one is that, not only this is a tiny 3D picture that you can put on display, but it also FLATTENS so you can put it in an envelope and mail it! Pop-up card and diorama, all-in-one!
So – shall we begin?
1. First step will be to choose your papers. I chose a collection of 4 shades of orange cardstock. Feel free to choose patterned paper instead, as long as it’s as heavy as cardstock, so it won’t come out too flimsy.
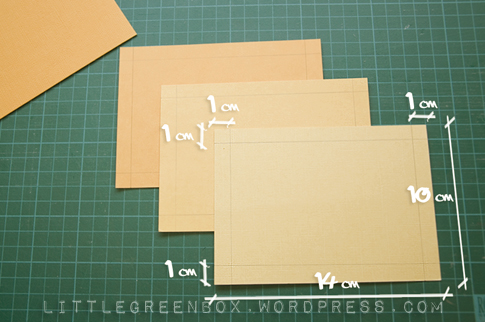
Next, cut your papers so they’ll measure slightly less than your envelope. My envelope was a 11×15 cm, so I’ve cut all my papers 10×14 cm. The diorama comes out a bit thick, so you’ll want to make sure it slides easily in and out of the envelope. Not using an envelope? cut it any size you want!
Use a pencil and mark a 1 cm inner frame on the back of three of the papers, leaving out the one paper you chose for the back of the diorama. I wanted my shades of orange to go from light (in the front) to dark (on the back), so I left the darkest shade unmarked.
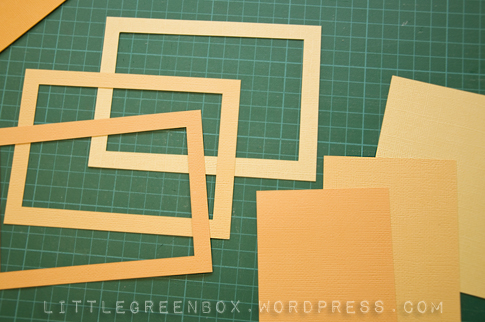
2. Cut out the frames you marked (remember – the back of the diorama stays uncut!). Keep the insides of the frames aside, we’ll use them in a moment.
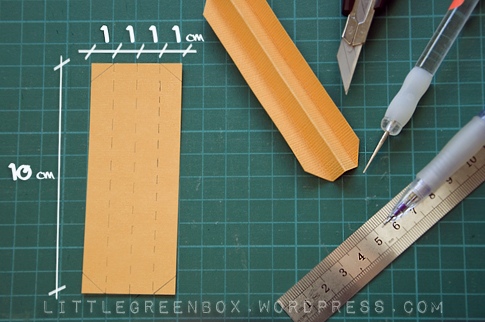
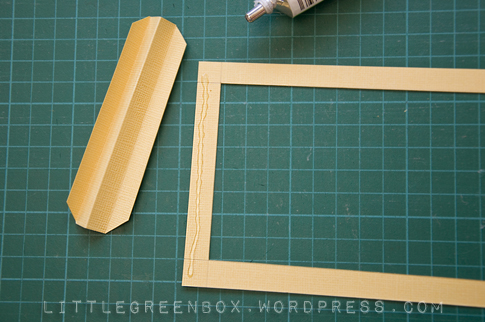
3. Using the insides of the frames from the previous step, cut two strips of paper from each color. Each strip should measure 10×4 cm. Score the strips using a bone folder or stylus, following the measurements in the picture below. Trim the corners as shown below and fold the strips to create little zig-zags. These pieces are the “hinges” of our little pop-up diorama.
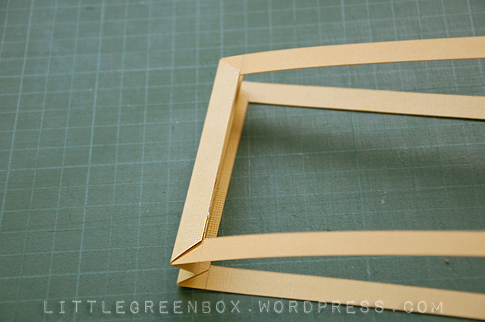
4. Take your first frame, the one you want to place in the front, and add a stripe of glue to the back of one of its shorter edges. Make sure to use the glue on the back – we’re trying to keep the rough edges out of sight!
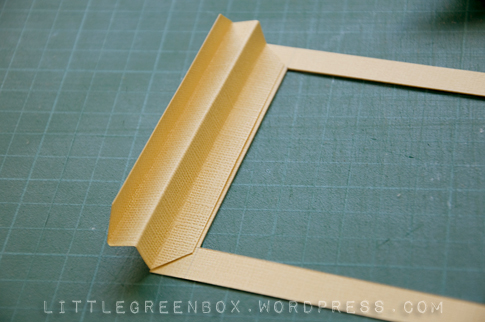
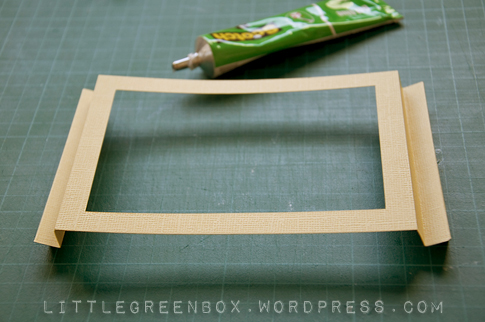
5. Take one of the “hinges” in the same color as the first frame and attach. Make sure that when you turn the frame over to its right side, everything is neat and aligned, the hinge’s glued tab is not peeking from the side (or the inside) of the frame.
Repeat this step on the other short edge of the frame, with the second coordinating hinge.
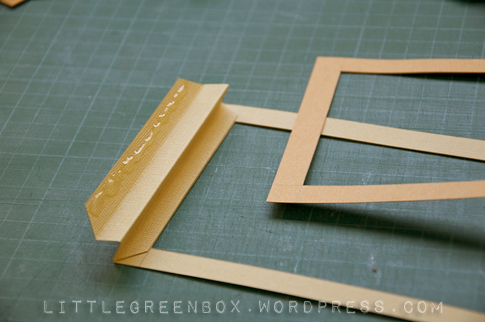
6. With the first frame facing down, add a stripe of glue to the inner tab of one of the attached hinges.
7. Place the next frame in line on the hinge, making sure it’s not sticking out on the top or the bottom.
8. Close the tab with the glue on top of the frame. Repeat on the other side.
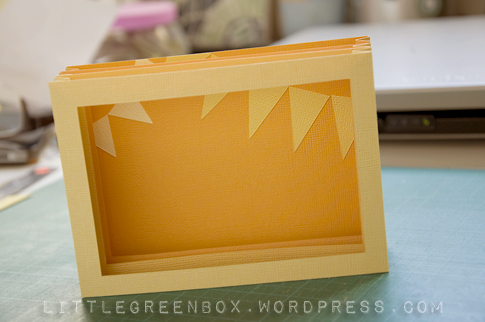
9. If you made it this far – you got it! You have completed the first scene of your diorama!
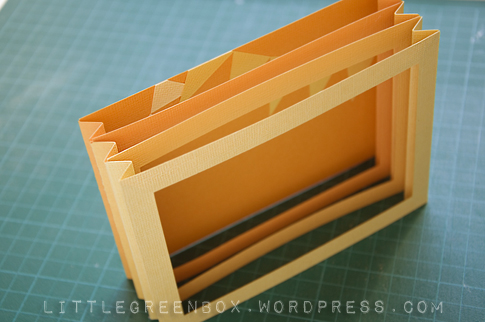
10. If you follow steps 4-8 with the rest of the frames, you’ll receive this finished diorama base! I warmly recommend to decorate the last piece – the back of the diorama – in advance. It’s much easier than trying to stick your fingers in there for stamping or gluing…
11. Now you can stamp, cut, punch whatever elements you want, to create your special little scene.
TIPS AND TRICKS:
* I wouldn’t recommend adding more frames if the diorama is meant to be placed in an envelope. However, if it’s purely for decoration, you can add as many frames as you want!
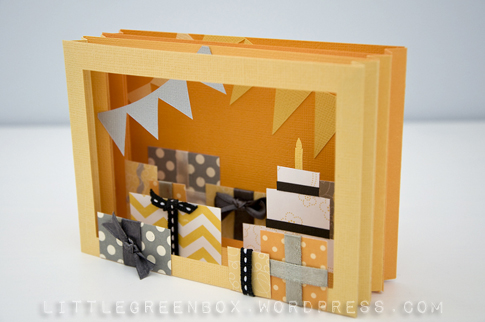
* Use the entire frame, not just its bottom (as I did with the gray flags). It’ll make the diorama seem deeper and more dramatic.
* The back of the diorama doesn’t HAVE to be uncut. You can make it as a frame too, creating a see-through diorama.
* Why cut square frames? keep an approximately 1 cm margin (just to make sure the frame is solid), and cut the inside in the shape of a curtain, clouds, forest branches…
* Frame the diorama in a shadow box to get a very cool 3D decorative piece!
This diorama flattens to fit an envelope, but when pulled out it pops right up and becomes 3 dimensional and awesome!
Have fun with it!
ShirA




Big time WOW!! You don’t stop to amaze me every time. How is the little Chalfinio?? 🙂
אין עליך מותק!
מדהים.
האם את מעבירה סדנאות של כרטיסי פופ אפ?
אני מעוניינת
אני מעבירה סדנאות אבל יוצאת אוטוטו לחופשת לידה… אם תעקבי אחרי הבלוג אני מפרסמת כאן סדנאות באופן שוטף.
אני אמשיך לעקוב. שיהיה בהצלחה.
אני בחופשת לידה – כבר חודשיים…
ויש לי מלא זמן ליצור . דווקא כשאני עובדת יש פחות זמן
http://www.tapuz.co.il/blog/userblog.asp?foldername=picpuk
wow.. i found out your page just by accident and i’m pretty amazed. u made a wonderful job, even by making all those tutorials. many thanks… and keep going 🙂
היי! ניסיתי לעשות את הדיורמה הזו, אבל היא לא ממש הלכה לי בגלל שלא מובן פה איך מחברים את שתי המסגרות הנפרדות- יש משולש נוסף שם בתמונה הסופית. הדבקתי והפרדתי כמה פעמים וזה לא יצא כמו בתמונה הסופית וגם למסגרות יצאה בטן כזו ולא ישר כמו בתוצר הסופי שלך.
בסוף הוספתי עוד אקורדיון כזה ואז זה היה נפוח ופיצץ את המעטפה… אשמח אם תוסיפי עוד תמונה של השלב החסר עם הסבר, תודה 🙂
הי ענבל, לצערי בימים אלה לא אוכל להכין דיורמה נוספת לצילום. המידות והתמונות לקוחות מתהליך ההכנה של הדיורמה המצולמת, כך שלא אמורה להיות בעיה. אם הבנתי נכון הקושי היה בהתקדמות מהשלב המצולם של שתי מסגרות והלאה. הרעיון הוא להמשיך ולחבר כל מסגרת נוספת לזו שלפניה באותו אופן – הוספת אקורדיון לגב המסגרת הקדמית והדבקתו לגב המסגרת הבאה, וכן הלאה. מעל שלוש מסגרות ורקע (תלוי בעובי הנייר, כמובן), הדיורמה עלולה לא להכנס למעטפה, אלא אם כן משתמשים במעטפה גדולה יותר. מקווה שעזרתי במגבלות הטקסט… בהצלחה!
את מדביקה ישירות את שתי המסגרות אחת לשניה, או שאת יוצרת אקורידאון נוסף שמחבר ביניהם? ואם אקורדיאון נוסף, אז יש לו גם 4 מלבנים שמו שמחבר 2 מסגרות או פחות? מקווה שאני מובנת 🙂
בין כל מסגרת לזו שמאחוריה אני מדביקה את אותו סוג “אקורדיון” המוצג בתמונות. הסיבה להווצרות בטן במסגרות יכולה להיות טמונה בגודל לא אחיד של מסגרות או הדבקה לא מדוייקת. בנוסף, שימי לב שגם אצלי, בשלב 9, נראה כי למסגרות יש קימור. עם הדבקת האלמנטים המסגרת בעצם מוסיפה חומר ומתחזקת.
ראיתי שגם אצלך באחת התמונות יש “בטן”, אבל אח:”כ בסוף לא רואים אותה.
הוספת אקורידאון ניפחה את הדיורמה יותר מידי ואז במעטפה היא לא נכנסה טוב…
היי!
מה הניק שלך בתפוז? רציתי לשלוח לך פרטית ואני זוכרת שאת שם לפי כרטיסים של תאילנד וכו’.
פרסמתי כרטיס שעשיתי לפי ההדרכה שלך עם לינק, כמובן, אבל רק אחרי שפרסמתי ראיתי שכתבת לבקש ממך רשות קודם… אז הנה לינק לבלוג שלי:
http://www.tapuz.co.il/blog/net/viewentry.aspx?EntryId=2512351&r=1
יש שם גם לינק לסרטון של הכרטיס שהעליתי ליוטיוב שגם שם כמובן שמתי קישור להדרכה שלך. כמו כן, העליתי את התוצר הסופי בלבד לדף עסקי שלי בפייסבוק וציינתי שזה ל-בני,
כלומר לא מוכרת את זה…
(זה המקרה היחיד בו לא פרסמתי לינק להדרכה)
אם יש אלו בעיות עם הפירסומים האלה
אז אני כמובן אוריד/אשנה וכדומה.
תודה ושבת שלום!
הי,
הניק שלי בתפוז הוא שירולית, לפני הלידה היתה לי שם פינת הדרכות קבועה (מקווה לחזור לזה בקרוב).
הי שירה,
הייתי אצלך בסדנא בשבוע שעבר, כרטיסי פופ-אפ מתנות ב”מסטיקים”. אני היום בבית מושבתת אחרי מי-שפיר אז היה לי שפע של זמן לעיין בבלוג שלך (כמה טלויזיה אפשר לראות)?
הבלוג מקסים. את עושה דברים מדהימים והדיורמה היא רעיון נפלא שמעולם לא ראיתי בשום מקום אחר. בלי ספק אנסה את זה כשאקום מהמיטה (אם יהיה לי אז זמן).
איך את מוצאת זמן לכל הפרטים האלה???
ודבר אחרון, את כל החיתוכים של מגזרות נייר (כמו מנורת שלחן, דמויות וכו’) את חותכת
ביד? שבלונות?
את מציירת בעצמך את קווי המתאר ואז חותכת?
בהחלט גרמת לי לחזור ליצור אחרי שנים שלא נגעתי בזה בגלל חוסר זמן.
המון תודה,
גליה
הי גליה!
שמחה מאד שאהבת את הבלוג! מוצאת זמן – ובכן, כבר לא כל כך… הבלוג והסדנאות נותנים מוטיבציה. את מגזרות הנייר אני מאיירת (בעיפרון, בגב הנייר) וחותכת בסכין. לתורך סדנאות אני מאיירת במחשב וחותכת במכונת הסילוואט המופלאה שלי. שמחה מאד שעשיתי לך חשק 🙂
מקווה שנתראה בסדנאות הבאות
שירה
Supercool ShirA!! u’ve created such an easy flowing tutorial!! What seemed difficult, just looks a lot easier!!
Thank you for putting it up!! Very beautiful -Am planning to make 2 of these for parent’s day..(need 2 cuz now that am married)
Will look for a different setup (scene) though..If you can think of anything, feel free to throw in your ideas..
2 creative minds r better than 1..
&thanks again for such a beautiful tutorial
Cheers
Shraddha (From India)
Hi Shraddha!
Welcome to my blog, I’m glad you like it 🙂
What is usually celebrated on parents day? maybe you should choose a general theme, like balloons and clouds, city skyline with starry night, branches of trees with some flowers…
Good luck!
ShirA
Thank you dear girl !! thanks for those ideas..I’ll share my work once (if at all) I’m done..
thanks for so much beauty n creativity!! ur blogsite is amazing..
Happy blogging & thanks for spreading the joy 🙂
Shraddha
I accidentally came by your blog. It is JUST AMAZING!!
I became an instant subscriber and fan!!!
I love your creative ideas that just POP!!
My bro’s B’day is coming up, and I’m planning to make one of these.
It is super cool!
But, I want another theme…
Something colorful…
Please Help me out!! I want something with a lot of colour, and balloons and if possible, a pop up cake….(I know how to make them… THANKS TO YOU!!!)
You are Super Talented!!!
Please Keep Blogging!
TFS!!!
P.S. I am honored to be in the presence of such TALENTED people like yourself!
– Ramya (from Singapore)
Hey, thanks! happy you like my work 🙂
How old is he? are you aiming for a kid’s theme or adult?
You are Welcome!!!
He’s going to be 17
Thanks for your help!!!!
I prefer a kid’s theme…
Thank you SO much!!!!!!
As I said earlier, I also want to add some balloons… Is that possible??
Thanks in Advance!!!!!!!!
You can add the balloons on the top of the frames, embellishing the top part mostly, instead of the bottom like I did. I would probably cut paper balloons and adding real embroidery string to it, that’ll be nice!
Thank you SO much!!!
That is SO helpful!!!
Dear ShirA,
Following up on my email greeting to you, would you open to us linking to your blog as additional resource as well as the possibility of using images from the “Pop Up Diorama Tutorial”? We will definitely credit you & your images accurately.
Let me know what is comfortable for you and hopefully we can work something out.
Thanks!
Odelia